FB

Showing posts with label south indian. Show all posts

Wednesday, 17 August 2016

Appam and Egg curry

The two best friends.. appam and egg curry. Although I love chicken, I still prefer egg curry with appam. This has been my favourite since childhood and now I get to finally pass on the "appammania" to my baby. My 10 months old baby had appam for the first time today and absolutely loved it. What more, he had egg curry too! Of coarse the curry was customised for him but tasted just as good as what I normally would make. 


Everyone has their own style of making appams with two things in common, rice and fresh coconut. I have also omitted baking soda and/or yeast as they turn out fairly bubbly after fermenting (just like dosa, idli)

Ingredients for Appam 

1 cup rice
2 cups coconut water
Tender coconut of one coconut
1 tsp sugar
Pinch of salt
Baking soda (Optional, for extra fluffiness)

Wash rice thoroughly and add coconut water to it. Leave it for fermenting for at least 6 hours. If you are planning for dinner then you can start the process in the morning. After 6 hours, grind the rice and coconut water along with tender coconut, sugar, salt.

Let it stand for another hour.

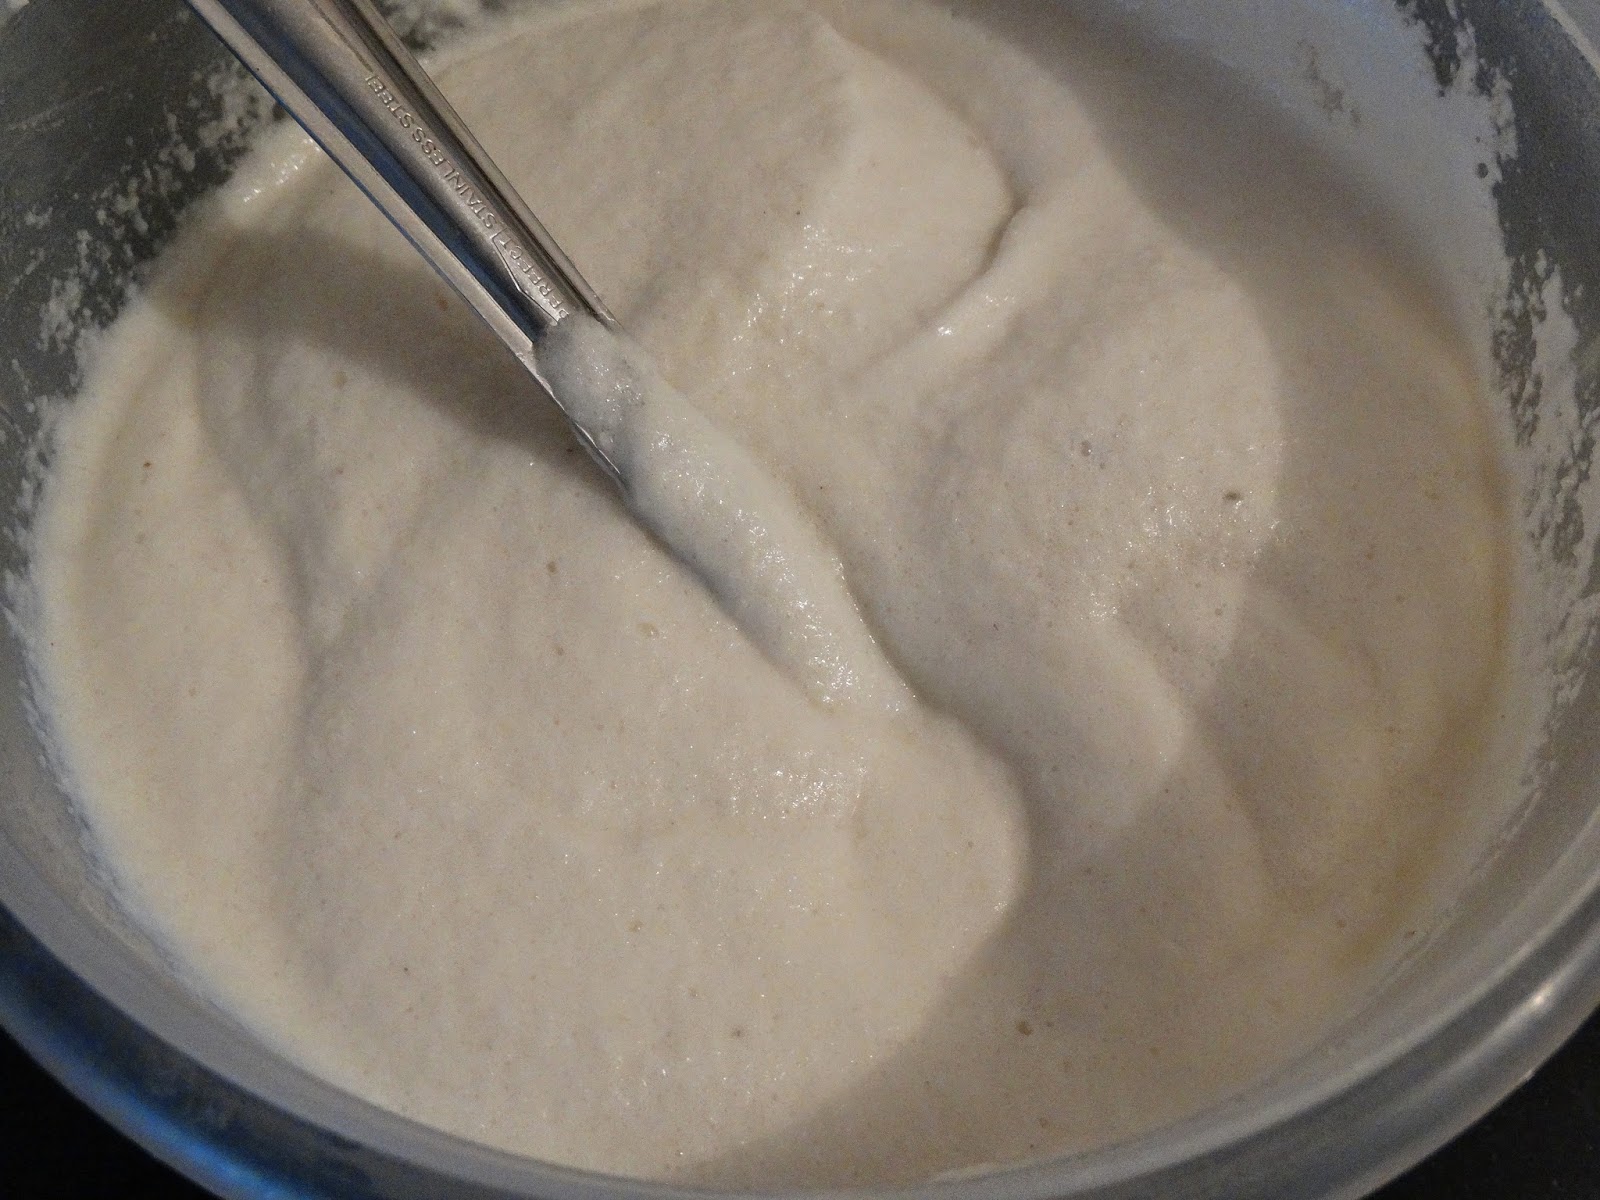
The batter should look like this.


If you want to add soda, do so just before making appams. The appams shown in the pictures do not have soda.

Traditionally, appams are made in appachetti which sadly I do not have :( tch tch. So I make them in regular non stick pan which is why the appams in the picture look flat. 


You need to make appams on medium heat. Ladle some batter on to the pan in the centre and gently spread in all directions. While pouring the batter, simmer the flame, then increase the flame to medium and cover with a lid for about 50 seconds. They don't usually stick to the pan but if they do then take few drops of oil on a tissue paper and wipe the pan before each use.

Most of us with the habit of making dosas will get tempted to add oil at the time of frying.. its actually not required but I myself ended up adding oil and then realised!


They are done when the sides start to come off from the pan. 

For that perfect white appam, do not flip the appam, also there is no need. I was being extra cautious because of the kid. 

Your appam is ready.. enjoy! :-)


Oh wait, you need egg curry too. So here is my baby friendly egg curry which tastes as good as normal egg curry.

If you don't eat eggs then vegetable stew, chole curry or soya chunks curry are good options.

Ingredients for Egg curry

4 Eggs
1 tsp ginger and garlic paste
2 onions finely chopped or pureed
3 tomatoes finely chopped or pureed
2 tsp coriander powder
Turmeric
Salt and chilli powder as per taste
2 tbsp oil or ghee

Heat oil in kadhai, add onions, ginger and garlic, fry till onions turn transparent. Add tomato and cook for 2 minutes. Add coriander powder, turmeric, salt, chilli powder and mix well. Add water till the gravy is completely under water. 

Simmer the flame. Break eggs into the gravy by leaving some gap between them. Do not mix or stir. Just cover the lid and let it cook for about 10 minutes. Remove the lid and cook till excess water evaporates.

Egg curry is ready!

Enjoy Appam and egg curry :-)


Some people have doubts about giving fermented food to babies. 
My answer is simple, if you are giving idli, dosa then you can give appam too. 

Saturday, 10 January 2015

Rava and Oats Dosa

I realise that in spite of spending all my life in North, I remain a South Indian at heart. I love all things South Indian, silk sarees, food etc. Even though I eat everything, my comfort food will always be idli, dosa, rice :) 

So today I am sharing the recipe of my favourite dosa, rava dosa and I think its safe to assume that rava dosa is your favourite dosa too? Well this one has a twist! It has a secret ingredient and that is Oats!! There.. I can not keep a secret for too long, can I! This I can say is one of those rare recipes which are healthy and tasty at the same time. With the goodness of oats and rava and the spice of ginger and green chilli it makes for a satisfactory breakfast or evening snack.


Onion, oats and rava dosa


So lets check out the recipe.

Ingredients (Serves 2)

1 cup Sooji rava (Upma rava)
1 cup Oats
1/2 cup Rice flour
1 tbsp sour curd (2-3 days old curd)
2 green Chillies
1 finely Chopped Onion
1/2 cup Chopped Coriander
1/2 tsp finely Chopped Ginger
1/2 tsp Jeera (Cumin Seeds)
Salt to taste

Heat 4 cups of water and switch off just before it reaches boiling point.
Add rava, oats and rice flour to water. Mix well and leave it for 20 minutes.
When the water is at room temperature, add rest of the ingredients and mix well.

Why hot water? Usually you need to soak rava for at least 40 minutes before it gets ready. I was running out of time so used hot water to speed up the process and it did help!


Now comes the tricky part, frying rava dosa.

If you are wondering why tricky, it is because the consistency of this batter is nothing like regular dosa batter. This is more watery and you can not use a spoon to spread the batter on pan.

Heat the pan until smoke appears. Turn the gas to medium heat, pour few drops of oil and wipe the pan clean using a tissue paper. 

Increase the flame, now take spoonful of batter and start pouring gradually from the outside and move inside, just the opposite of normal dosa. Also, pour without touching the pan. Turn the pan around to spread the batter evenly. Pour drops of oil around dosa and in the center and when it has turned brown, carefully turn it upside down. Continue to fry on high heat. 

It is done when it has slightly browned on other side too. 

Don't start with huge portions of batter in the beginning. Check out this picture to see how tiny my first dosa was. When you get a hang of it, you can aim for bigger and bigger dosas.


You can have these oats and rava dosas as is or pair them with coconut chutney.

Have fun! 


Look at the beautiful texture..


Update (30 June 2016): This can be a yummy baby food too. If your baby (less than 1 year) is okay with tiny bits and pieces then go for this dosa. You may skip chillies.


Monday, 8 September 2014

How to make rawa upma interesting


Upma, as boring as it may sound, can be very interesting if made in the right way. My husband used to hate the sight of upma until I came along :D So what is so different in the way I make upma.. here are some tips to make yummy upma

Roast the rawa before boiling. You may microwave for 3 minutes or more depending on the quantity. It should turn golden brown. Upma will be less sticky.

The rule book says, for 1 part of rawa, use 2 parts of water. I say, use 4 parts of water. This way upma will not become like a cake, it will have a soupy texture for as long as possible.

Use tomatoes, corn, finely chopped carrots, beans or any other suitable vegetable for that extra flavour.

Like sweets, where the general idea is, more ghee, better taste, same applies to upma also. Like you would not think twice before adding that extra spoon of ghee to your sweet preparation, even upma should be treated the same way. 1 tsp of ghee for 1 cup of rawa while cooking will be just perfect.

Use fresh oil and give a tadka of chana dal, udat dal, handful of ground nuts along with usual suspects.This is followed by onions and vegetables.

Add salt to water at the time of boiling. Add rawa to boiling water and stir continuously to avoid lumps.

And REMEMBER, it takes less time to cook than maggi noodles. Simmer the flame soon after adding rawa and cover the lid for two minutes. Turn off the gas and give a standing time of 4 minutes. Keep the lid on!

Sprinkle some coriander at the time of serving.


Sunday, 8 June 2014

South Indian Pizza - Uttapam with spicy beetroot topping

I have tried most cuisines across India but South Indian is my favourite. I can have idli, dosa, uttapam for breakfast, lunch, dinner forever and not to forget, rice!! A die hard South Indian eh?! :-D


Okay, so I love to try different Uttapams. One such Uttapam turned out to be a huge hit in my family. Traditionally Uttapams are made up of chopped onions, tomatoes, green chillies and some ginger in dosa/idli batter. Here is another recipe to make Uttapams more interesting


Ingredients [There is no fixed quantity for any of the ingredients. You can use as much or as less as possible depending on your taste]

Idli batter [or Dosa batter ]
Finely chopped onions
Finely chopped beetroot
Finely chopped green chillies
1 heaped tsp Jeera
Salt to taste
Oil for frying


Add some salt to the batter. If it is idli batter you are using then you need to add some extra water.
Mix onions, beetroot, green chillies, jeera and salt. 
Heat a frying pan, use a tissue paper and wipe its surface with oil.


Pour a ladle of batter and spread it to make a round shape of half inch thickness. 
Add the beetroot mix on top, spread it evenly, do not press. 


Pour some oil around the corners and on top, simmer the flame and let it cook for 2 minutes.
Flip and cook for another 2 minutes. Flip again, increase the flame and let the bottom turn brown by cooking for another minute.

Thats it! Uttapam is ready!! Enjoy it with your favourite chutney. Few chutney recipes can be found here.. Plain Coconut chutneyTomato chutney, Coconut chutney, Turai chutney (Beerakaya pachadi)


How to make Idli batter

I must say, life has become much easier after I brought home mom's spare mini wet grinder for making idli, dosa, vada batter or any other batter of any kind.

But if you do not have a grinder, you can still make the batter using your mixer. I myself was using a mixer for almost 4 years. Lets jump to the process of making idli batter..

Ingredients
2 parts Idli rawa [Easily available in local grocery store.]
1 part Urad dal
1/2 cup Poha
Water as needed

Soak idli rawa and urad dal separately for at least 4 hours and at most 8 hours (overnight).


Idli rawa squeezed with hands, in ground urad dal. 
Put urad dal and poha to grind. Add little water at a time. Remember, key is to add only as much water as required. Batter should not be watery. There is no way you can reverse it if you end up adding excess water.. so be careful.. :)
Take some batter between your fingers and check if its smooth or still is granulated. Continue grinding till it becomes smooth.

Meanwhile, take fistful of idli rawa and squeeze out excess water and put in a dry, clean bowl. Repeat the process for entire rawa.
Pour the urad dal batter over squeezed idle rawa. Mix well and leave it to rise overnight.

The next day, you will notice that the batter has risen and turned bubbly. Mix till it settles. Now it is ready to use.

P.s.. I cook idli in a flat round steel bowl which I mostly use for cooking rice. This is quick and involves less number of utensils. Brush the bottom with some oil and pour 1 inch thick batter at a time.
You may use cooker or idli maker. If you are using cooker, remember not to put the whistle! Just put it on high flame and cook for 5 minutes.


This is after grinding the batter. It is smooth and flat.


This is after the idli batter has risen. Notice the fluffy texture with little bubbles?


And this is how idli looks like in my lunch box :-)


Sunday, 20 April 2014

Beetroot pacchadi (chutney)

Not a big fan of beetroot or even worse, hate it?? Worry not, you can still continue to read this post and I urge you to try it too. I bet you will make it again and again and again!

This post is specially for my friend Ami, who otherwise does not eat Beetroot in salad or curry but has an appetite for the chutney :-) and I simply love to see her do "ummmm yummy" every time she has some :-)


So what do you do with beetroot pacchadi? Well it goes well with dosa, masala dosa, steamed rice, simple paratha fried in ghee.. in short, use your imagination.


How easy it is to make beetroot pacchadi? Like any other chutney, it is simple to make. Make lots of it and store it in air tight container. Is it possible to make on a weekday? Yes you can.. it hardly takes 30 mins to put it all together and ingredients are regularly available in most kitchens.

Ingredients

3 Beetroots, skin peeled
1 heaped tsp tamarind pulp
[For preparing tamarind pulp, remove seeds and dip tamarind in warm water, stuff the tamarind as much as possible, to avoid watery pulp. Put it in a mixer and grind till it reduces to pulp. For storing for future use, add a pinch of salt to the pulp and store in a dry air tight container in fridge]
2 green chillies
1 inch long ginger piece
5 garlic pods
1 tsp jeera
1 tsp oil
Sea salt as per taste

For tempering
1 tsp oil
1 tsp chana dal
1 tsp udath dal
1 tsp mustard seeds
10 curry leaves
1 dried red chilly


Roughly chop beetroot. Saute jeera in oil and add beetroot and cook for 5 minutes with lid covered and flame simmered.

Let it cool down and grind it along with ginger, garlic, green chillies, sea salt.

Prepare for tempering
Heat oil and roast chana dal and udat dal for few seconds. Add mustard seeds and when they start spluttering, add curry leaves and red chilly and turn off the flame. Pour the tempering on chutney and mix well.

As you can see I use a lot of dal in tempering as it makes the chutney crunchy. 


Tangy beetroot chutney can be served along with plain rice, parathas, idli, dosa, can be used as bread spread or eat it just like that!


Wednesday, 2 April 2014

Plain coconut chutney

This is the simplest chutney packed with a punch. It gets its strong flavour from all the raw ingredients that go into it. If you love coconut then this is one chutney you must try.

What more, it has mainly 3 ingredients that are commonly available in your kitchen on any given day.

Preparation time is only 5 minutes! Lets quickly jump to the recipe

Ingredients
1 small onion
2 cups heaped fresh coconut
1 garlic clove (Make it two if you like more garlic)
1 or 2 green chillies
1/2 tsp tamarind pulp
Salt to taste

For Tadka/ tempering
1 tsp chana dal
1 tsp split udath dal
1/2 tsp mustard seeds
5-8 curry leaves
2 tsp oil

Grind all the ingredients in a mixer by adding little water. Add salt at the time of grinding.

Heat oil in small kadhai. Add chana and udath dal. When they turn brown, quickly add mustard seeds. When the seeds start spluttering, turn off the gas and add curry leaves and mix well.

Move the chutney into a bowl and put the tempering on chutney and mix well.

Lovely chutney is ready! Enjoy it with idli or dosa or vada!!


Sunday, 23 February 2014

Masala Dosa

Now that you know how to make dosa batter.. lets go to the next step.. masala dosa.

Masala dosa has evolved over a period of time. There are so many types of masalas that can go into dosa, some of my favourites are kaju curry (a speciality of Vizag), paneer curry and the latest addition is schezwan.
But lets not forget the original stuffing, alu masala.


The recipe you will find here is with alu masala.


Ingredients
Dosa batter

For the masala (4 dosas)
4 boiled potatoes peeled and mashed
1 green chilly finely chopped
2 onions cut julienne style
1/4 tsp ginger finely chopped
1 tsp udat dal
1 tsp chana dal
1 tsp sarson (mustard seeds)
1/2 tsp jeera (cumin)
3-4 methi seeds
Pinch of haldi
Salt to taste
2 tsp oil

Tip
To avoid dosa batter turning sour after 3-4 days, you should store the batter in fridge immediately after grinding. Night before you want to make dosa for breakfast, take as many spoons of batter as required and leave it outside for fermenting. This way rest of the batter remains fresh for a long time.

I keep atleast 4 potatoes boiled and stored in fridge as they are very useful in urgency. When you do not have time to prepare anything, you can always make alu tadka. Store boiled potatoes with peel, they stay for long.

For making masala
Heat oil in kadhai. When oil is hot, add methi seeds, chana and udat dal and immediately when they turn little brown, add sarson. When sarson start crackling, add jeera. Now add onions and green chilly along with ginger. Mix thoroughly. When onions turn brown, add mashed potatoes, haldi and salt. Mix well. Cook for no more than 5 minutes and masala is ready. I add chana dal and udat dal make the masala crunchy, more fun.

For making dosa
Ensure that the non stick pan is hot. Now simmer the flame and spread thin layer of dosa batter. Now increase the flame, apply some oil around the corners of dosa and 1 or 2 drops in center. You will notice that the dosa will start to leave the pan from corners, then take a big spoonful of masala and smear a thin layer on one half of the dosa.  Now fold the other half to cover the masala. Remove dosa from pan.

Trick for making crispy dosa is to not flip it. You will know it is ready when dosa leaves the pan from corners. Just keep for 5 seconds more and remove it. Always simmer the flame when spreading batter over pan and always keep high flame when dosa is cooking.